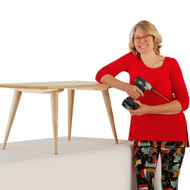
How to Build a DIY Mid Century Modern Coffee Table
Posted by galen on Aug 15, 2017
This DIY Mid Century coffee table, —styled after Paul McCobb’s classic creation—is the perfect table build for everyone from new DIYers to professional woodworkers. Widely renowned for simple and timeless design, our DIY Mid-Century Modern coffee tables offer quick and straightforward assembly.
Learn how to build your own custom DIY MCM coffee table with our step by step guide. This guide can also be used to build a DIY Mid Century Modern side table, both are great DIY projects to add some fun to your weekend!
GETTING READY
You’ll need:
- 1 table top
- 4 tapered legs with cleat bolts installed
- 2 cleats to attach the legs to the top
- 12 mounting screws (supplied with our leg and cleat sets)
- Power drill
- Measuring tape
CHOOSING THE COMPONENTS
1. CHOOSE A TABLE TOP
It all starts with choosing the size of your table top. A good general rule is a coffee table top that is 1/2 to 2/3 the length of your sofa. You can use a pre-existing top like something thrifted or upcycled, or buy a completely customized top from us. The top in these photos is 20'' x 40" x 3/4'' with the Sting Ray edge.
Design Your Own Table Top Here
2. CHOOSE THE TABLE LEGS
Our classic McCobb Mid Century Modern Legs are offered in 4 species of wood: cherry, maple, walnut, and white oak. For a more polished look, consider adding metal tips to your table legs. Solid brass tips are offered in several finishes ranging from bright to dark to enhance any setting.
3. CHOOSE THE CLEATS
For an authentic modern look with legs lightly splayed, select the Angled Cleats, pictured here. (If you prefer the legs to be 90 degrees vertical, go for Straight Cleats.) To determine the best length of your cleats, subtract 3-4'' from the width of your top—cleats are best placed 1 1/2'' to 2'' from each table edge.
Choose Your Leg & Cleat Set Here
PUTTING IT TOGETHER
1. APPLY MONOCOAT NATURAL OIL
For a long-lasting finish, we recommend applying Monocoat Natural Oil to the parts before you begin assembly. If you select a finished top and add finishing service to your parts, we will apply this for you. Alternatively, you can purchase it here and apply Monocoat yourself.
2. MARK CLEAT LINE
Lay the tabletop upside down on a smooth, clean surface. With your measuring tape, mark a distance 6 inches from each end of the table. This line is where you will attach the cleats.
3. POSITION CLEAT
Lay the first cleat down and carefully position so it is equidistant from the edges of the table, and square with the ends of the table. It should be 1 1/2'' to 2'' from each side, and 6'' from the closest end. If you’ve selected the angled cleats, make sure they face angled out toward the ends of the table.
4. SCREW CLEAT IN PLACE
Position the cleat and place a screw into each of the cleat's 6 pre-drilled holes. Hold the cleat firmly in place and use a power drill to drive the mounting screws in. Caution: The screws we supply with our leg and cleat sets will work on a 3/4'' or thicker top. A thinner top—or driving the mounting screws in too far—will ruin your tabletop!
Repeat the last 2 steps for the other cleat
5. SCREW LEGS IN PLACE
One by one, carefully align the bolt on each table leg with its corresponding cleat hole. Gently twist until the threads meet, then rotate until the leg is seated snuggly. The legs can be easily taken off or on for shipping or storage. Flip the table over, and take a step back to see your creation.
Completion
We all love to create. At TableLegs.com, we think the best creation is one that leaves a lasting impression.That is why we are dedicated to bringing quick, easy, and beautiful modern furniture to living rooms all over the world.
Once you have everything set up, feel free to take a picture and send it to us or tag us @TableLegsDotcom on Facebook and Instagram!! We love what we do and the designs we offer, and it is a truly rewarding experience to see our products in their new home.

